
Hi, In this post we are going to know about Laravel Log Viewer using LogViewer Package in Laravel 5.6. As default Laravel Framework have a log file and it always keeps all runtime error & exception like Query error, URL not defined properly, Database exceptions Ect. Usually, it keeps all errors in single file with full error log details and it also very hard to view and analyze what error raised in it. And also laravel keeps all error log in a single file by default. For avoiding and simplifying this process Laravel has a new package that is LogViewer.
This package reduces our work to analyze and fix runtime error in our laravel application. It also helps us to make it a better web application. In this post, we are using LogViewer package to read error logs in a better way of a day to day log file. After setup this package into our Laravel application we can easily control real-time error logs and issue to improve our application. This package will generate log file based on day to day manner to control errors in our applications. A LogViewer package will generate log file when an error raises in a real-time app.
Step 1: Install Laravel
Here, we need new Laravel application for Laravel Log Viewer using LogViewer Package and demonstration. the following command helps to create a new application.
|
1 |
composer create-project --prefer-dist laravel/laravel myLaravel |
Step 2: Install Package
In this step, we have to download arcanedev/log-viewer package goto your command and run the following command
|
1 |
composer require arcanedev/log-viewer |
Step 3: Make configuration for the application
This step, we need to configure package provider in config/app.php file and add following service provider.
|
1 2 3 4 5 |
'providers' => [ .... .... Arcanedev\LogViewer\LogViewerServiceProvider::class, ], |
Step 4: Publish the Config Package
Here we are going to publish the install package with a help of the following command. Here we publish the package with a common command if any issue arises while public we can use –force key to publish force. If we need to publish with config file details only means we use –tag=config key. Another option is to publish with many languages means use –tag=lang key. It provides many language folders under resource/view folder.
|
1 2 3 4 |
php artisan log-viewer:publish php artisan log-viewer:publish --force // help us to publish the package forcely if any issues php artisan log-viewer:publish --tag=config // help us to publish with config details php artisan log-viewer:publish --tag=lang // help us to publish different language view files |
Step 5: Config .env file
Using environment (.env) file we can config base and required a key for our application. In this now we can add LOG_CHANNEL key for generating log file daily basic.
|
1 |
LOG_CHANNEL=daily |
Step 6: Checking the package status
In this, we can check the weather everything installed and configured right manner.
|
1 |
php artisan log-viewer:check |
Error arrive in package – Check weather logging.php file created in config folder. Particular file present means just create a file with following details in name of logging.php under config folder.
|
1 2 3 4 5 6 7 8 9 10 11 12 13 14 15 16 17 18 19 20 21 22 23 24 25 26 27 28 29 30 31 32 33 34 35 36 37 38 39 40 41 42 43 44 45 46 47 48 49 50 51 52 53 54 55 56 57 58 59 60 61 62 63 64 65 66 67 68 |
<?php use Monolog\Handler\StreamHandler; return [ /* |-------------------------------------------------------------------------- | Default Log Channel |-------------------------------------------------------------------------- | | This option defines the default log channel that gets used when writing | messages to the logs. The name specified in this option should match | one of the channels defined in the "channels" configuration array. | */ 'default' => env('LOG_CHANNEL', 'stack'), /* |-------------------------------------------------------------------------- | Log Channels |-------------------------------------------------------------------------- | | Here you may configure the log channels for your application. Out of | the box, Laravel uses the Monolog PHP logging library. This gives | you a variety of powerful log handlers / formatters to utilize. | | Available Drivers: "single", "daily", "slack", "syslog", | "errorlog", "monolog", | "custom", "stack" | */ 'channels' => [ 'stack' => [ 'driver' => 'stack', 'channels' => ['single'], ], 'single' => [ 'driver' => 'single', 'path' => storage_path('logs/laravel.log'), 'level' => 'debug', ], 'daily' => [ 'driver' => 'daily', 'path' => storage_path('logs/laravel.log'), 'level' => 'debug', 'days' => 7, ], 'slack' => [ 'driver' => 'slack', 'url' => env('LOG_SLACK_WEBHOOK_URL'), 'username' => 'Laravel Log', 'emoji' => ':boom:', 'level' => 'critical', ], 'stderr' => [ 'driver' => 'monolog', 'handler' => StreamHandler::class, 'with' => [ 'stream' => 'php://stderr', ], ], 'syslog' => [ 'driver' => 'syslog', 'level' => 'debug', ], 'errorlog' => [ 'driver' => 'errorlog', 'level' => 'debug', ], ], ]; |
Just remove the single laravel.log file in storage/log folder.
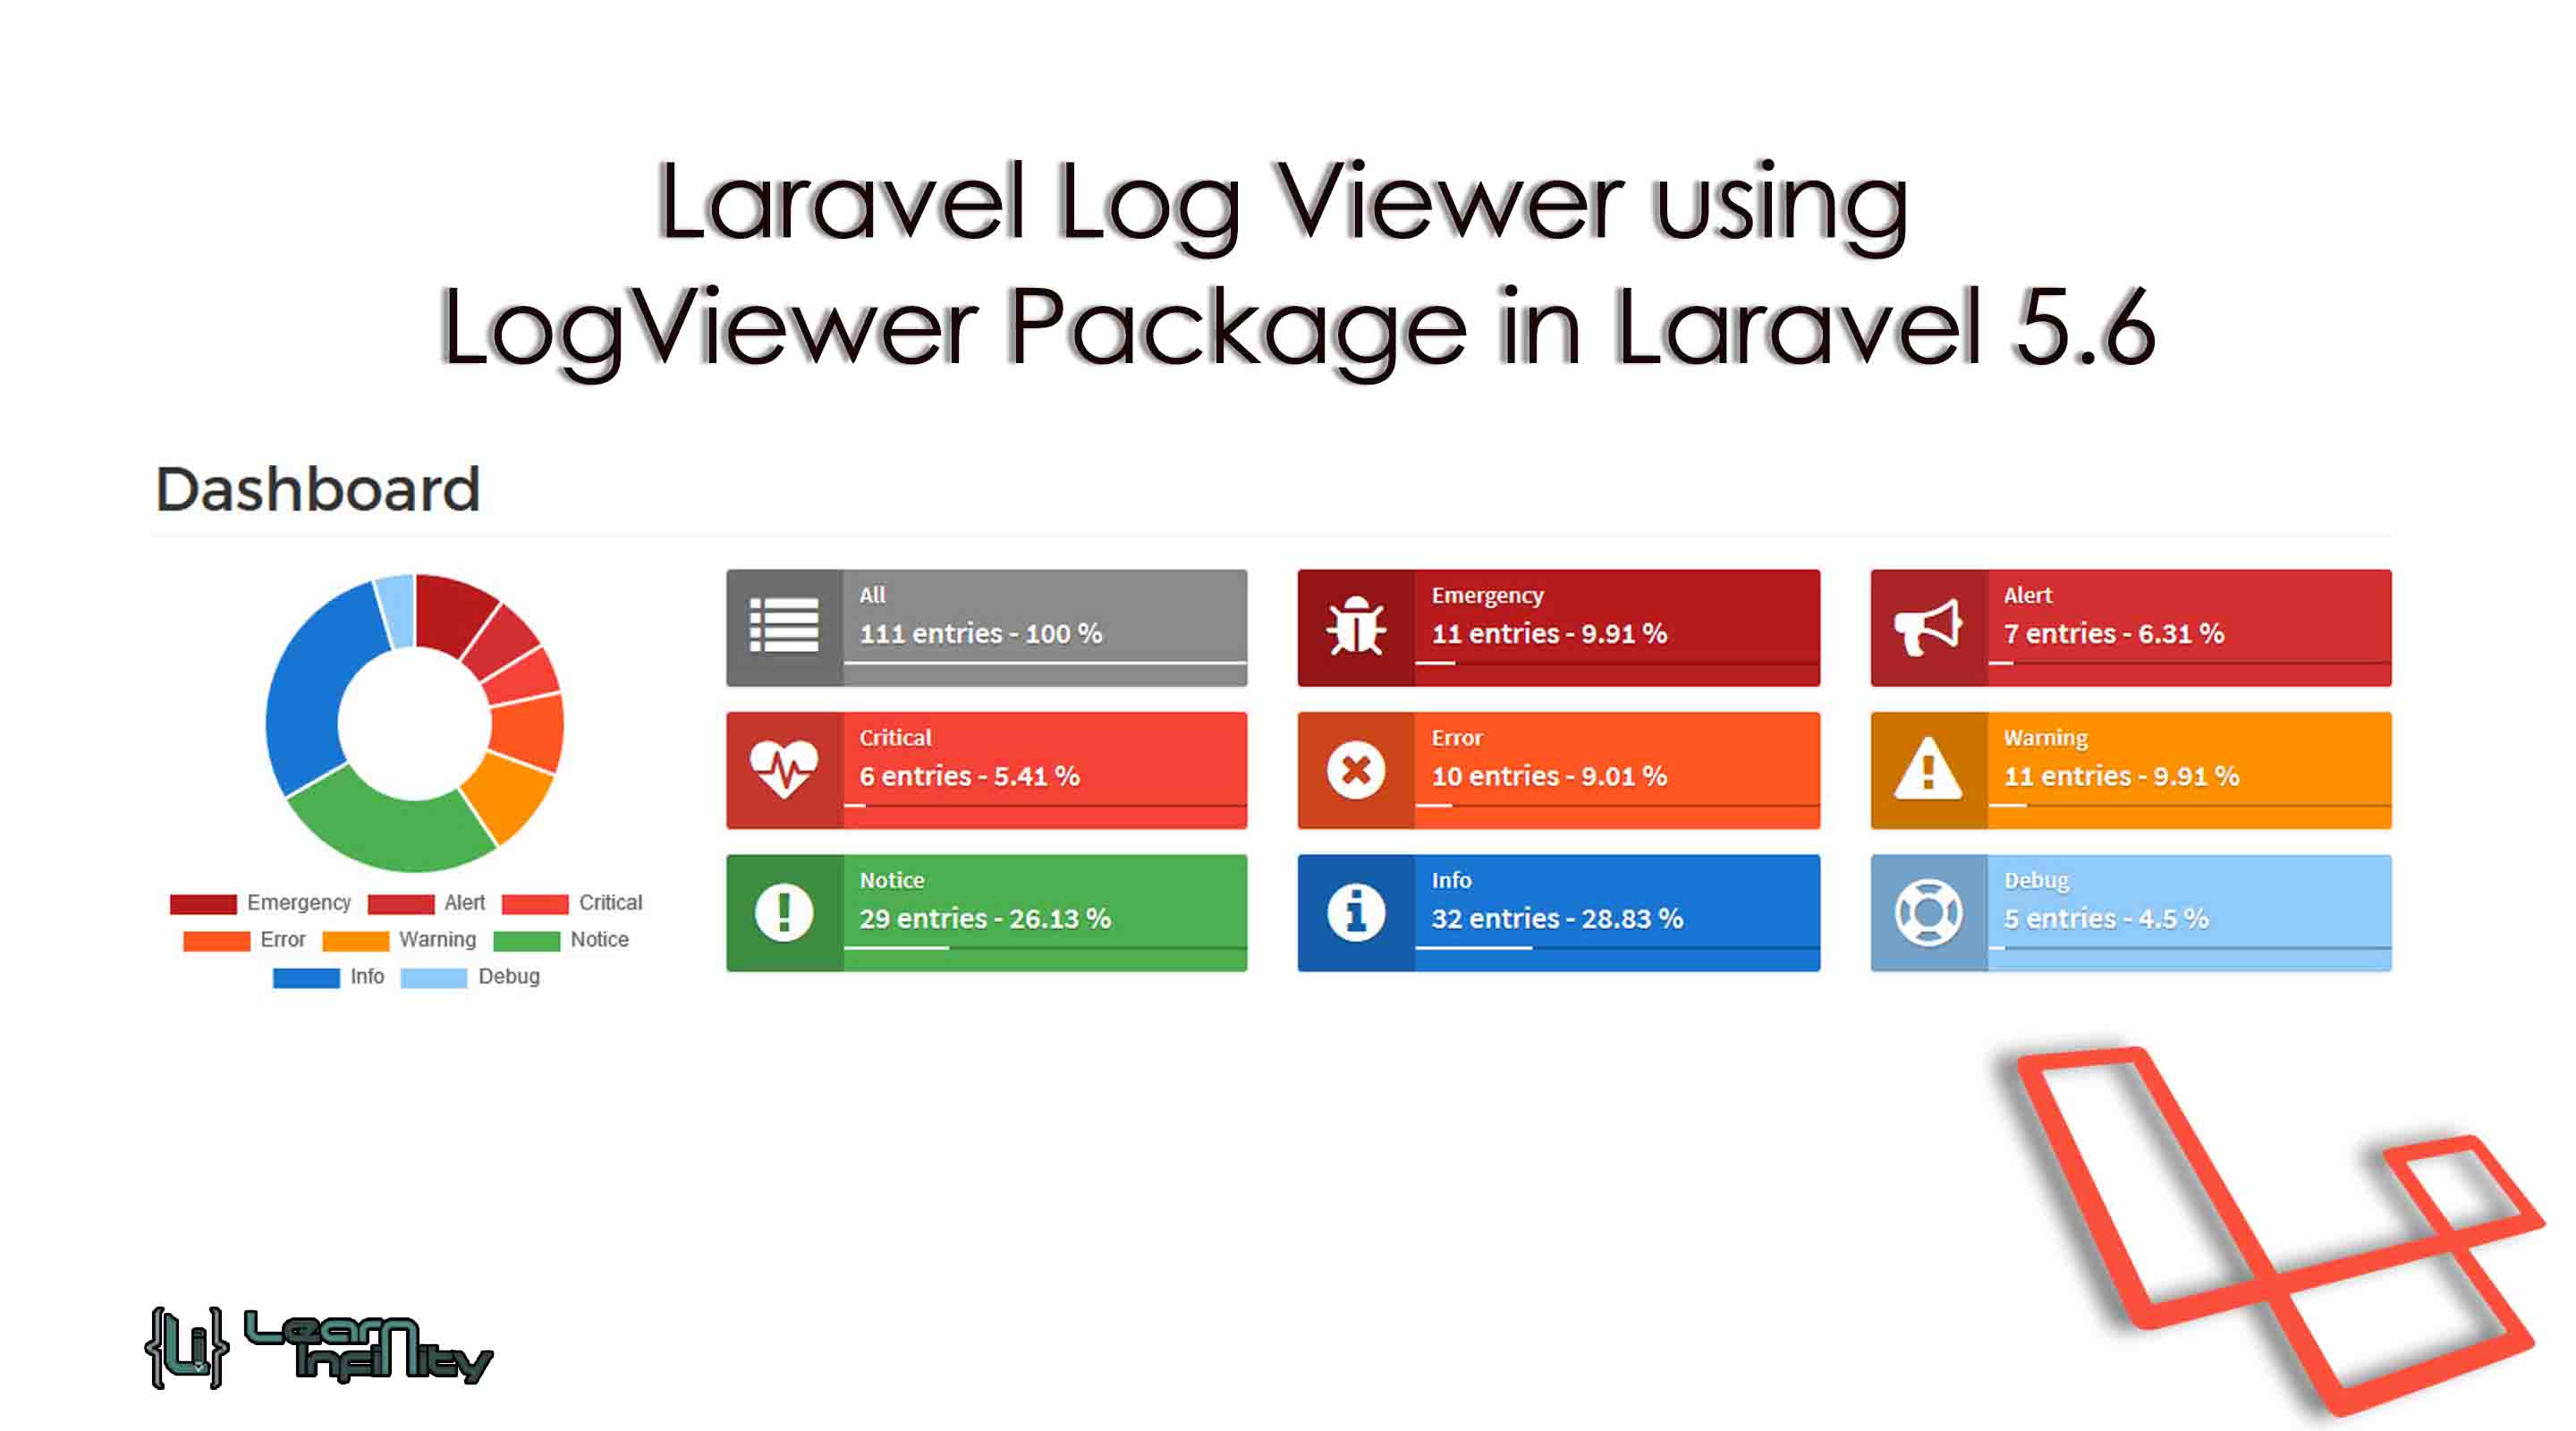
Step 7: Test and demonstrate the application
That’s it just demonstrates the application using the following URL
|
1 |
http://your_application_path/log-viewer |